HxC firmware for Gotek drive instructions

Post Reply
Jeff
Site Admin
Posts: 5887
Joined: Fri Oct 20, 2006 12:12 am
Location: Paris
Contact:

HxC firmware for Gotek drive instructions

Post by Jeff » Sat Sep 19, 2015 9:46 am

HxC firmware for Gotek drive : Introduction

The HxC Firmware for Gotek extend/enhance the original Gotek firmware with many floppy formats support and functionalities !

:arrow: The HxC firmware is currently able to emulate almost all existing floppy disk formats :
  • 3", 3"1/2, 5"1/4, 8" disks supported...
  • Single and Double sided disks supported.
  • FM / SD, MFM / DD or HD densities supported.
  • Bitrate : 125Kb/s, 250Kb/s, 300Kb/s, 500Kb/s...
  • All RPM supported : 300 RPM, 360 RPM, 600 RPM...
  • All sector sizes supported : 128B, 256B, 512B, 1024B, 2048B...Mixed sector sizes supported.
  • All track skew and sector interleaving supported.
  • Up to 255 tracks per disk supported.
  • Special : Copy protections, Variable bitrate and special formats supported.
  • *.HFE (v1 & v3), *.ADF, *.ST, *.DSK, EDSK, *.IMG, *.IMA, and many others file image formats directly supported ! See the complete list.
:arrow: Optional user Interface enhancements : LCD / OLED screens support, Rotary support, Additional buttons support, buzzer support...
:arrow: True "file config less" mode : Embedded configuration interface.
:arrow: Compatible with the HxC Direct Access protocol : HxC File selectors and HxCMount supported.

:arrow: Software and firmware updates !

:arrow: Extended user support -> For any problem, question or enhancement request don't hesitate to contact us ! :
  • Email. (replace .fr by .com)
Instructions : Summary

:arrow: First Time Bootloader Flashing/Programming process

:arrow: Firmware update procedure

:arrow: Usage instructions

:arrow: Optional Add-on : I2C SSD1306 128x32 OLED LCD Screen

:arrow: Optional Add-on : I2C LCD Screen

:arrow: Optional Add-on : The "Select"/middle button

:arrow: Optional Add-on : Buzzer sound output

:arrow: Optional Add-on : Rotary switch

:arrow: Troubleshooting

Contact / Support / Firmware updates & News - Stay tuned !

:arrow: On this forum !

:arrow: On the HxC2001 Facebook Group - Please subscribe ! :)

:arrow: By Email !


Download


USB STM32 HxC Floppy Emulator firmware for Gotek :

:arrow: USB STM32 HxC Floppy Emulator firmware for Gotek update: HXCFEUSB_HFE_beta_firmware.zip

:arrow: Last firmware release notes : USB_HFE_hxc_floppy_emulator_firmware_release_notes.txt

:arrow: Online Bootloader programmer: STM32_SerialBridge.zip

You can purchase the firmware on this page : https://hxc2001.com/store/


File selector:

:arrow: HxC Floppy Emulator Manager/File selector (for Atari ST,Amstrad CPC and Amiga)


PC/Mac/Linux Software :

:arrow: HxC Floppy Emulator PC/Mac/Linux software: HxCFloppyEmulator_soft.zip

:arrow: Last release notes : hxcfloppyemulator_soft_release_notes.txt

:arrow: HxCFloppyEmulator_soft_beta.zip (beta/snapshot version)

:arrow: SourceForge repository : Softwares & libraires sources


Quick install pack archives :

Contains some installation packs for various machines :

:arrow: QuickInstall_FloppyDiskImages.zip


Download page :

The main download page can found there :
:arrow: HxC 2001 Download page

Jeff
Site Admin
Posts: 5887
Joined: Fri Oct 20, 2006 12:12 am
Location: Paris
Contact:

Re: HxC firmware for Gotek drive instructions

Post by Jeff » Tue Oct 03, 2017 7:16 am

First time bootloader Flashing/Programming process :

All the mentioned files are in the Online Bootloader programmer archive

STM32 Based hardware bootloader Downloader and Flasher.

This software allows you to download and program the STM32 HxC bootloader into
a STM32 based floppy emulator hardware. (For example these "Gotek" or the next STM32 HxC Floppy emulator units).

Note : This Flash procedure should be needed only once per device since the STM32 HxC bootloader
will allows you to update the device with a simple USB stick. See the below post if you just want to update your HxC Gotek.


To use it you need :

:arrow: A STM32 based floppy emulator hardware to flash.

:arrow: A PC under Windows connected to Internet.

:arrow: Any 3.3V serial connection to connect the Floppy Emulator hardware to the PC.

:arrow: Your account information. Go to this page to purchase the firmware and to get your account : :arrow: http://hxc2001.com/store

To Flash the device

:arrow: Set the BOOT0 signal to the VCC3V3 on the device. (Add a connection between "J3" and the VCC3V3 pin. See below).

:arrow: Connect your serial adapter to the device and to the PC. (GND,RX,TX,+5V)
Note 1: To power the device, you can use a external +5V source or the +5V coming from your USB adapter.
Note 2: Cross connect your serial adapter to the device : TX wire to the RX pin, RX wire to the TX pin.

:arrow: Start the SecSerialBridge software and select the COM port of your serial adapter. Click on the button "Open"

:arrow: Enter the server and your contacts data. Click on the button "Connect".
If the connection to the server succeed you will get the "Link is UP !" status.

:arrow: Some seconds later you should get the "Device detected." status.
Note : If you don't get it, try to reset the STM32 by making a short connection of the reset signal (RST) to GND.

:arrow: Once the device is detected, you can press the "Program" button.
The download and programming process finish with a "Done !" Status. The whole process take some minutes.

Once done, remove all the connections previously done on the programming pins.

The device should now display "Ldr" at power up and wait for a USB flash drive with a UPD file to use.
Here it is the UPD archive with the latest firmware version .

http://hxc2001.com/download/floppy_driv ... rmware.zip

Programming connector

The Programming connector is near the power input connector. (SFRC922,SFRC526,...)

Code: Select all

 ----------------------------
 |
-+--- NC
-+--- GND      O J3 (BOOT0)
-+--- GND      O VCC3V3
-+--- +5V     OO TX
 |        +5V OO RX
 |        GND OO RST
 |--
 |  |
 |  |
04/28/2015

(c) 2006-2018 Jean-François DEL NERO / (c) HxC2001

Jeff
Site Admin
Posts: 5887
Joined: Fri Oct 20, 2006 12:12 am
Location: Paris
Contact:

Re: HxC firmware for Gotek drive instructions

Post by Jeff » Tue Oct 03, 2017 7:21 am

Firmware update procedure :

(The HxC bootloader is needed -> see the "Bootloader Flashing/Programming process" post above).

All the mentioned files are in the USB Stick STM32 HxC Floppy Emulator firmware update archive
NOTE : The UPD firmware files are usable when your drive have the HxC Bootloader.
See <<First Time Bootloader Flashing/Programming process>>to get it.

USB HxC Floppy Emulator Update procedure :

:arrow: Copy the new firmware file (*.upd) to a FAT32/FAT16/FAT12 USB flash device.
:arrow: Insert the USB Stick into the emulator and press both buttons.
:arrow: Power up the device and keep the buttons pressed during at least 2 seconds.
:arrow: Wait some seconds... its done !

Bootstrap error codes:

Error 1 : (blink 1 time and 2 seconds pause cycle) No entry point (->no software flashed)
Error 2 : (blink 2 time and 2 seconds pause cycle) USB init error.
Error 3 : (blink 3 time and 2 seconds pause cycle) FAT error.
Error 4 : (blink 4 time and 2 seconds pause cycle) UPD File not found!
Error 5 : (blink 5 time and 2 seconds pause cycle) Bad UPD File header! (bad file)
Error 6 : (blink 6 time and 2 seconds pause cycle) Bad data crc! (file corrupted)
Error 7 : (blink 7 time and 2 seconds pause cycle) Bad data size!
Error 8 : (blink 8 time and 2 seconds pause cycle) Write error (STM32 flash error)

Jeff / HxC2001

Jeff
Site Admin
Posts: 5887
Joined: Fri Oct 20, 2006 12:12 am
Location: Paris
Contact:

Re: HxC firmware for Gotek drive instructions

Post by Jeff » Tue Oct 03, 2017 7:33 am

Usage instructions :

All the mentioned files are in the USB Stick STM32 HxC Floppy Emulator firmware update archive
General STM32 HxC Floppy Emulator Firmware Usage: -

:arrow: Format the USB Stick in FAT32 (FAT12 & FAT16 also supported).
:arrow: (Optional if you have an LCD/OLED screen) Copy the right HXCSDFE.CFG file to the root of the USB Stick
(See "Mode selection" below for more details).
:arrow: Copy or generate your disks images to the USB Stick. (See "File images supported" below for mode details).
:arrow: Insert the USB Stick into the emulator.

Mode selection

There are actually three modes available :

Normal mode

In this mode the file image/disk to load is directly selected with the buttons
and the LCD screen. One I2C screen is needed to be able to use this mode.
An optional "select" push button can be connected on the JA connector.
No extra software needed.

config file is optional (Config-Less support).

If you you want to have the last image selection image feature, the config file to copy to the root of the flash media
for this mode is into the folder Config_Files/Normal_mode/HXCSDFE.CFG from the
USB Stick STM32 HxC Floppy Emulator firmware update archive

Indexed mode

In this mode the file images must be named DSKA0000.HFE, DSKA0001.HFE, DSKA0002.HFE,...
The 2/3 digits display shows the actual file number selected.

No LCD and/or extra push button is needed to use this mode.
No extra software needed.

This is the recommended mode when you don't have the extra LCD & button and when
your machine can't use the autoboot mode (see below).

The config file to copy to the root of the flash media for this mode :

Config_Files/Indexed_mode/HXCSDFE.CFG from the USB Stick STM32 HxC Floppy Emulator firmware update archive

"Autoboot" / File selector mode

In this mode, the AUTOBOOT.HFE software is used to select the images to load
directly on the computer.
This software is actually available on Amiga, Atari ST and CPC computers.

No LCD and/or extra push button is required to use this mode, but the LCD may help you
to see which disk is actually mounted.

The config and the software file to copy to the root of the flash media for this mode :

http://hxc2001.com/download/floppy_driv ... anager.zip

Internal parameters settings :
There is many parameters that can be changed. You generally don't have to change
them as the default values are fine in most cases.

Anyway if needed, these settings can be changed with the internal menu.

To access the setting menu, remove the USB stick and press both buttons. Then you can navigate
through the various available options.

This menu is available with both LCD/OLED and 7 Segments Gotek drive.

The file selectors have also a setting page that can be used to change these
parameters.

:arrow: OLED/LCD Gotek Menu :

Here is some of the available parameters :

- Floppy Interface mode (predefined modes and custom modes).

- System Family selection.

- Single or Double step track mode.

- Emulation Bitrate (Auto or forced).

- Floppy write protect state.

- Step Sound output settings.

- LCD/OLED characters per line setting (16/18/20/21 or 40 characters per line).

- LCD Backlight timeout setting.

- Select Button emulation (on/off and timeout setting)

Note : To clear/reset all settings to the default values, press the right button at power up.

:arrow: Original 7 Segments Gotek Menu :

-> To access it, remove the USB Stick and press both buttons.
--> Choose the sub menu number - wait some seconds for the selection validation.
---> Check and/or change the setting - wait some seconds for the selection validation.

The new setting is then saved into the device.

Current Menu and sub menu definition :

Menu 0 - System family selection :

00 = AUTO (DEFAULT)
01 = Amiga
02 = Acorn
03 = Atari ST
04 = IBM PC AT/XT
05 = Camputer Lynx
06 = Commodore 1581
07 = Thomson
08 = x68000
09 = SAMCOUPE
0A = MSX
0B = Spectrum
0C = Akai
0D = Casio
0E = Emax
0F = Ensoniq
10 = General Music
11 = Korg
12 = Ensoniq ASR10 (Ensoniq Auto DD & HD support)
13 = Opus Discovery
14 = TI99/4A

Menu 1 - Interface mode :

00 = AUTO (DEFAULT)
01 = IBM PC DD
02 = IBM PC HD
03 = ATARI ST DD
04 = ATARI ST HD
05 = AMIGA DD
06 = AMIGA HD
07 = CPC DD
08 = GENERIC SHUGART DD
09 = IBMPC ED
0A = MSX2 DD
0B = C64 DD
0C = EMU SHUGART
0D = S950 DD
0E = S950 HD
0F = S900/S950 (Density Auto)
10 = PC DD/HD (Density Auto)

Menu 2 - Write protect mode :

00 = AUTO (DEFAULT)
01 = Write protected.
02 = Write enabled.

Menu 3 - Double Step :

00 = AUTO (DEFAULT)
01 = Single step
02 = Double step

Menu 4 - User interface mode :

00 = AUTO (DEFAULT/From Config file)
01 = Normal mode
02 = Indexed mode
03 = Autoboot/selector mode

Menu 5 - Auto select delay :

01-08 : Delay (number of seconds).

Menu 6 - Head settling delay :

00-30 : Delay (number of milli-seconds).

Menu 7 - Rotary type :

00 = 1 increment per step rotary.
01 = 2 increment per step rotary.
02 = Disable.

Menus 8<->E : Not currently assigned.

Menu F - Display firmware version

Note : To clear/reset all settings to the default values, press the right button at power up.
File images supported :
Direct support :

- Universal support :
All machines are supported by the (H)xC (F)loppy (E)mulator (HFE) file format :
*.HFE ( Read / Write ), *.HFE (v3 - Copy protected images/"ipf" support) ( Read )

- Amiga :
*.ADF ( Read / Write )

- Atari ST:
*.ST ( Read / Write )

- PC and compatibles (Computers, Synth and tools...)
*.IMG ( Read / Write ), *.IMA ( Read / Write )

- Microbee :
*.DSK ( Read / Write )

- MSX :
*.DSK ( Read / Write ), *.IMG ( Read / Write )

- Amstrad CPC/Spectrum/Tatung Einstein :
*.DSK (CPC/ZX Spectrum Normal & Extended DSK) ( Read / Write )

- Acorn :
*.ADL,*.ADM,*.SSD,*.DSD and *.ADF files support (all Read / Write )

- Camputer Lynx :
*.LDF ( Read / Write )

- Commodore C64 :
*.D81 ( Read / Write )

- Thomson machines :
*.FD ( Read / Write )

- TI99/4A
*.DSK ( Read / Write ), *.V9T9 ( Read / Write )

- Sam Coupé :
*.SAD ( Read / Write ), *.MGT ( Read / Write )

- Spectrum :
*.TRD, *.SDD, *.DSK (all Read / Write )
*.OPD (Opus Discovery)

- Akai (S900 / S950 / S01 / S20 / MPC...):
*.IMG, *.AKAI (DD & HD) (all Read / Write )

- Casio :
*.FZ1 (Read / Write )

- Emax :
*.IMG (Read / Write )

- Ensoniq :
*.IMG (Read / Write )

- General Music :
*.IMG (Read / Write )

- Korg :
*.IMG ( Read / Write )

- Roland :
*.OUT ( Read / Write )

The HFE files can be generated from almost any types of files images with this software :

http://hxc2001.com/download/floppy_driv ... t_beta.zip

Indirect image support (With the HFE support) :

Code: Select all

KRYOFLUXSTREAM      :  KryoFlux Stream Loader                (*.raw)
AMIGA_DMS           :  AMIGA DMS Loader                      (*.dms)
AMIGA_ADZ           :  AMIGA ADZ Loader                      (*.adz)
AMIGA_EXTADF        :  AMIGA EXTENDED ADF Loader             (*.adf)
AMIGA_OLDEXTADF     :  AMIGA OLD EXTENDED ADF Loader         (*.adf)
ZXSPECTRUM_FDI      :  ZX SPECTRUM FDI Loader                (*.fdi)
AMIGA_ADF           :  AMIGA ADF Loader                      (*.adf)
ACORN_ADF           :  ACORN ADF Loader                      (*.adf)
AMSTRADCPC_DSK      :  Amstrad CPC DSK Loader                (*.dsk)
ATARIST_DIM         :  ATARI ST DIM Loader                   (*.dim)
ATARIST_STX         :  Atari ST STX/Pasti Loader             (*.stx)
ATARIST_STT         :  ATARI ST STT Loader                   (*.stt)
COPYQM              :  COPYQM IMG Loader                     (*.dsk)
TELEDISK_TD0        :  TELEDISK TD0 Loader                   (*.td0)
ATARIST_MSA         :  ATARI ST MSA Loader                   (*.msa)
ATARIST_STW         :  STW Loader                            (*.stw)
RAW_IMZ             :  IBM PC IMZ Loader                     (*.imz)
HXCMFM_IMG          :  HXC MFM IMG Loader                    (*.mfm)
ORIC_DSK            :  ORIC DSK Loader                       (*.dsk)
ATARIST_ST          :  ATARI ST ST Loader                    (*.st)
ROLAND_W30          :  Roland W30 file Loader                (*.w30)
SPS_IPF             :  SPS IPF Loader                        (*.ipf)
TI994A_V9T9         :  TI99 4A V9T9 Loader                   (*.v9t9)
AMIGA_FS            :  AMIGA FS Loader                       (*.amigados)
PROPHET2000         :  PROPHET 2000 Loader                   (*.img)
RAW_IMG             :  IBM PC IMG Loader                     (*.img)
FLP_IMG             :  FLP PC Magazine image Loader          (*.flp)
MSX_DSK             :  MSX DSK Loader                        (*.dsk)
FAT12FLOPPY         :  FAT12/MS DOS Loader                   (*.fat)
HXC_HFE             :  SD Card HxCFE HFE file Loader         (*.hfe)
VTR_IMG             :  VTR IMG Loader                        (*.vtr)
IMD_IMG             :  ImageDisk IMD file Loader             (*.imd)
HXC_AFI             :  HxC AFI file loader                   (*.afi)
C64_D81             :  C64 D81 Loader                        (*.d81)
ZXSPECTRUM_TRD      :  Zx Spectrum TRD Loader                (*.trd)
ZXSPECTRUM_SCL      :  ZX SPECTRUM SCL Loader                (*.scl)
THOMSONTO8D_SAP     :  THOMSON TO8D SAP Loader               (*.sap)
TRS80_JV1           :  TRS80 JV1 Loader                      (*.jv1)
TRS80_JV3           :  TRS80 JV3 Loader                      (*.jv3)
TRS80_JVC           :  TRS80 JVC Loader                      (*.jvc)
SVD                 :  SVD Loader                            (*.svd)
NEC_D88             :  NEC D88 Loader                        (*.d88)
X68000_HDM          :  X68000 HDM file Loader                (*.hdm)
RAW_LOADER          :  RAW Sector loader                     (*.img)
SNES_SMC            :  Super famicom SMC Loader              (*.smc)
VEGAS6809           :  VEGAS6809 image Loader                (*.veg)
TRS80_DMK           :  TRS80 DMK Loader                      (*.dmk)
TI994A_PC99         :  TI99 4A PC99 Loader                   (*.pc99)
APRIDISK            :  APRIDISK Loader                       (*.dsk)
ENSONIQ_EDE         :  ENSONIQ EDE Loader                    (*.ede)
FAT12FLOPPY         :  FAT12/MS DOS Loader                   (*.fat)
ENSONIQ_GKH         :  ENSONIQ GKH Loader                    (*.gkh)
THOMSON_FD          :  THOMSON FD Loader                     (*.fd)
CASIO_FZF           :  Casio FZF file Loader                 (*.fzf)
DRAGON3264_VDK      :  DRAGON32 & 64 VDK Loader              (*.vdk)
OBERHEIM_DPX        :  Oberheim DPX Loader                   (*.dpx)
ENSONIQ_EDM         :  Ensoniq mirage EDM Loader             (*.edm)
EMAX_EM             :  EMAX EM1 & EM2 Loader                 (*.em1)
SAMCOUPE_MGT        :  SAM COUPE MGT Loader                  (*.mgt)
SAMCOUPE_SAD        :  SAM COUPE SAD Loader                  (*.sad)
EMULATORII          :  E-mu Emulator II / SP1200 dsk Loader  (*.emuiifd)
EMULATORII_EMUII    :  E-mu Emulator II *.eii Loader         (*.eii)
EMULATORI           :  E-mu Emulator I dsk Loader            (*.emufd)
CAMPUTERSLYNX       :  CAMPUTERSLYNX Loader                  (*.ldf)
BBC_ADL             :  BBC ADL floppy image loader           (*.adl)
BBC_SSD_DSD         :  BBC SSD & DSD floppy image loader     (*.dsd)
FEI                 :  FEI Loader                            (*.fei)
SYSTEM_24           :  System 24 loader                      (*.s24)
SCP_FLUX_STREAM     :  SCP Stream Loader                     (*.scp)
APPLE2_NIB          :  Apple II NIB Loader                   (*.nib)
APPLE2_DO           :  Apple II DO Loader                    (*.do)
SPECCYDOS_SDD       :  Speccy DOS SDD File Loader            (*.sdd)
ARBURG              :  ARBURG RAW Loader                     (*.arburgfd)
GENERIC_XML         :  Generic XML file Loader               (*.xml)
Software step by step guide :

http://hxc2001.com/download/floppy_driv ... al_ENG.pdf

(c)2006-2018 Jean-François DEL NERO
(c)2006-2018 HxC2001

http://hxc2001.com
http://hxc2001.free.fr/floppy_drive_emulator/index.html

Jeff
Site Admin
Posts: 5887
Joined: Fri Oct 20, 2006 12:12 am
Location: Paris
Contact:

Re: HxC firmware for Gotek drive instructions

Post by Jeff » Tue Oct 03, 2017 7:43 am

Optional Add-on : I2C SSD1306 128x32 OLED LCD Screen

Note : Since the 3.0.26.1a, update your firmware if needed.

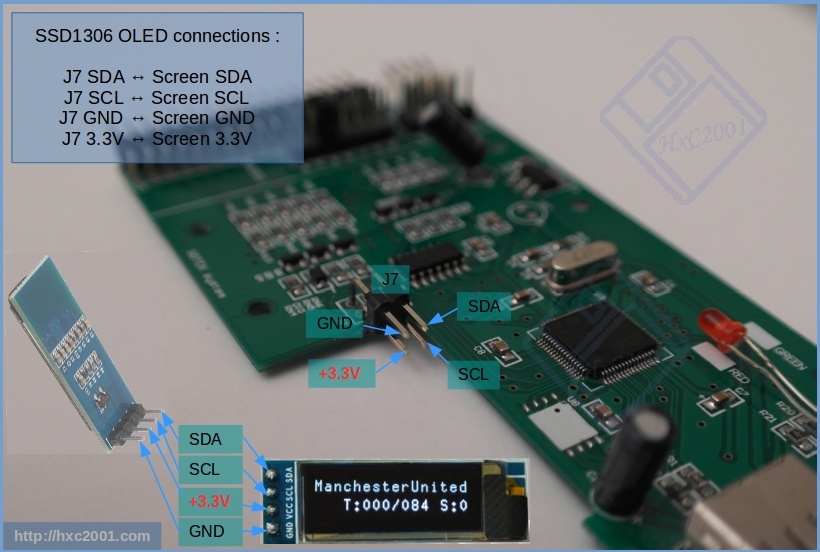
You can connect an SSD1306 based 128x32 OLED screen.

These screens are compatible with this firmware : http://www.ebay.com/itm/302110929185 ( IIC Interface ! )

You can connect the screen directly to the J7 connector. (additional pull-up resistors NOT required.)

- GND, VCC 3.3V, SCL and SDA position on J7

Code: Select all

                           _____|
                          |     |
                          | USB |
                          |_____|
        OO______________________|
    SDA OO|SCL
    GND OO|VCC3V3
        J7|
          |
__________|

! > Take care with the 3.3V and GND while connecting the screen. Any mistake may damage the screen ! < ! 
Image

Jeff
Site Admin
Posts: 5887
Joined: Fri Oct 20, 2006 12:12 am
Location: Paris
Contact:

Re: HxC firmware for Gotek drive instructions

Post by Jeff » Tue Oct 03, 2017 7:59 am

Optional Add-on : I2C LCD Screen

These kind of I2C LCD board is compatible with the firmware :

http://www.ebay.com/itm/IIC-I2C-TWI-SP- ... 484f235c20
(board only - without the LCD)

http://www.ebay.com/itm/IIC-I2C-TWI-SPI ... 258afcd8e4
(board only - without the LCD)

http://www.ebay.com/itm/New-Blue-IIC-I2 ... 338ed80545
(board + LCD)

http://www.ebay.com/itm/IIC-I2C-TWI-SP- ... 484f1ed4cd
(board + LCD)

Any I2C address is supported : The firmware scan automatically the I2C bus at power up (0x20-0x27 and 0x38-0x3F address range scanned)
So there is no specific requirement about the I2C address setting.

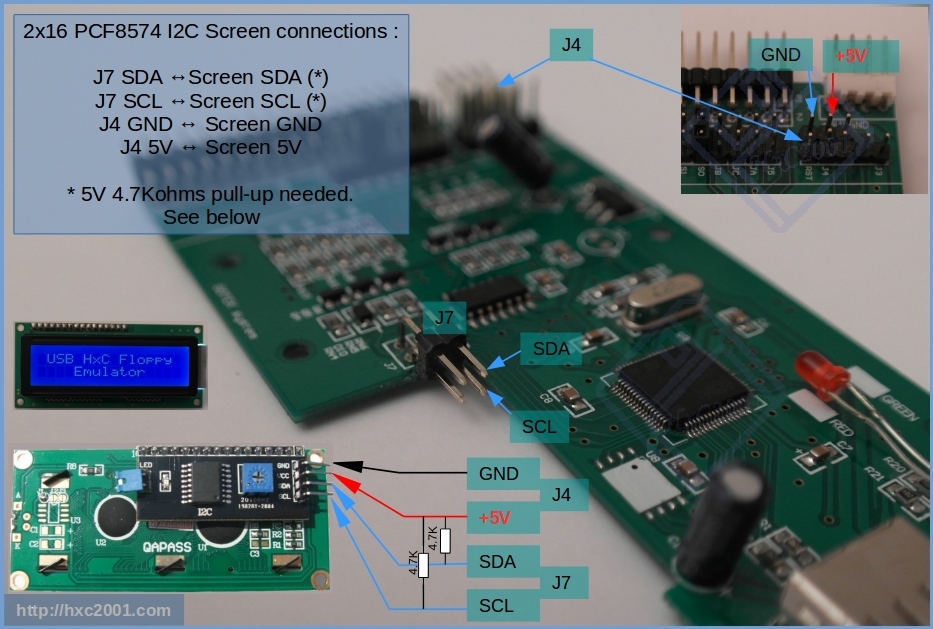
To connect the I2C LCD, you have to connect SDA & SCL at the J7 connector (see below).
Please note that 2 additional 4.7Kohms pull up resistors (+5V) are needed on SCL & SDA.
the +5V and GND wire can be connected on the programming connector (see below) :

If you want to build the I2C board yourself, here is the schematic:
http://hxc2001.com/download/floppy_driv ... ematic.pdf


- Possible +5V source on the PCB (on the programming connector):

Code: Select all

 _____________________________
 |
-+--- NC
-+--- GND      O J3 (BOOT0)
-+--- GND      O VCC3V3
-+--- +5V     OO TX
 |        +5V OO RX
 |        GND OO RST
 |--
 |  |
 |  |
- SCL & SDA position on J7 :

Code: Select all

                           _____|
                          |     |
                          | USB |
                          |_____|
        OO______________________|
    SDA OO|SCL
    GND OO|VCC3V3
        J7|
          |
__________|
Image

Jeff
Site Admin
Posts: 5887
Joined: Fri Oct 20, 2006 12:12 am
Location: Paris
Contact:

Re: HxC firmware for Gotek drive instructions

Post by Jeff » Tue Oct 03, 2017 8:02 am

Optional Add-on : The "Select"/middle button

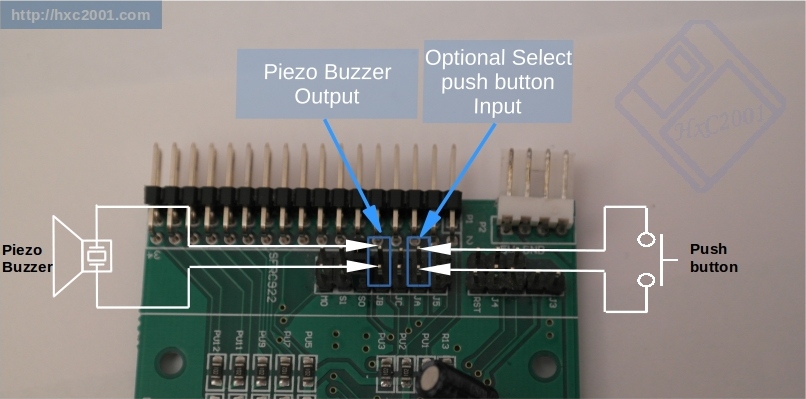
An additional button can be connected at the JA jumper position.
Needed if you want to browse the USB stick files images with the LCD and the button (Normal mode).
EDIT : Now optional since the firmware v3.0.21.1a

Image

Jeff
Site Admin
Posts: 5887
Joined: Fri Oct 20, 2006 12:12 am
Location: Paris
Contact:

Re: HxC firmware for Gotek drive instructions

Post by Jeff » Tue Oct 03, 2017 8:04 am

Optional Add-on : Buzzer sound output

You can connect a piezo or a magnetic buzzer to the JB jumper position.
A transistor is needed for the magnetic version.
The sound output can be disabled or enabled into the selector settings.
(Note : Please remove these old sound mod using directly the floppy step signal, they are producing reliability problems...)

Image

Jeff
Site Admin
Posts: 5887
Joined: Fri Oct 20, 2006 12:12 am
Location: Paris
Contact:

Re: HxC firmware for Gotek drive instructions

Post by Jeff » Sun Apr 29, 2018 11:37 am

Optional Add-on : Rotary switch

You can connect a Rotary switch to the J7 connector (Same connector used for the screens connection).

"Direction / Dir" -> J7 pin 1. (near the "JK" marking on the PCB)
"Clock / Ck" -> J7 pin 2.

- "Dir" & "Ck" position on J7 :

Code: Select all

                           _____|
                          |     |
                          | USB |
                          |_____|
    Dir OO Ck___________________|
    SDA OO|SCL
    GND OO|VCC3V3
        J7|
          |
__________|
If your rotary switch have also a push-button, you can connect it as the select button to the "JA" jumper position :

http://torlus.com/floppy/forum/viewtopi ... 486#p16461

Jeff
Site Admin
Posts: 5887
Joined: Fri Oct 20, 2006 12:12 am
Location: Paris
Contact:

Re: HxC firmware for Gotek drive instructions

Post by Jeff » Tue Jun 05, 2018 12:11 pm

Troubleshooting

Gotek drive with 3 digits 7 segments display:

:arrow: This doesn't work : The display doesn't work at all

Check that you have removed the BOOT0 strap after the bootloader programming.

:arrow: This doesn't work : I only see "LDR" on the display

You still have to finish the flash process : copy the latest firmware UPD file present into the firmware archive and insert the usb stick.

:arrow: This doesn't work : I see "NOR" on the display when inserting the USB stick

The emulator is in "NORmal mode".

Since you don't have any OLED or LCD screen, you need to use the indexed mode or the "autoboot" mode if you have an Amiga/Atari ST/CPC.
In this mode you must use the indexed config file and name the files images DSKA0000.XXX, DSKA0001.XXX, DSKA0002.XXX (replace XXX by the original file extension.) See the usage page for more details.

:arrow: This doesn't work : The floppy image appears to be loaded by the emulator, but the machine can't read the disk.
The Gotek green LED is permanently lit (no flashing)


The floppy ribbon is probably connected to the wrong way. Try to reconnect it to the other way.

Explanation : A wrongly connected floppy ribbon force the drive selection by short-circuiting the floppy signals to the ground, and make the selection LED always lit. Of course the machine can't communicate with the emulator in such situation.
Be aware that with some machines the floppy ribbon coloured wire is NOT the pin 1 !

:arrow: More tips and informations :
With this firmware the only valid jumpers positions are S0, S1 and MO. It is important to remove all others jumpers if present. The others pin/"jumpers" positions are now used by others functions/features (extra buttons, rotary, screen...).

Maych
Posts: 8
Joined: Wed Jan 02, 2019 4:04 am

Re: HxC firmware for Gotek drive instructions

Post by Maych » Sat Jan 05, 2019 5:15 am

The S0 jumper was on, so I pulled it and tried to load a file. That didn't see the file, so I flipped the cable and that didn't do it. I then put the jumper back on with the cable flipped and no luck loading the file.

All of these efforts/attempts did resolve the disk issue mentioned before, so I can get to the menu on the DSS-1 and attempt to load a multisound, but all when attempting to load the multisound/file the DSS-1 just hangs posting "Searching for Msounds on disk"

Jeff
Site Admin
Posts: 5887
Joined: Fri Oct 20, 2006 12:12 am
Location: Paris
Contact:

Re: HxC firmware for Gotek drive instructions

Post by Jeff » Sat Jan 05, 2019 11:37 am

Maych wrote:
Sat Jan 05, 2019 5:15 am
The S0 jumper was on, so I pulled it and tried to load a file. That didn't see the file, so I flipped the cable and that didn't do it. I then put the jumper back on with the cable flipped and no luck loading the file.

All of these efforts/attempts did resolve the disk issue mentioned before, so I can get to the menu on the DSS-1 and attempt to load a multisound, but all when attempting to load the multisound/file the DSS-1 just hangs posting "Searching for Msounds on disk"
with you current setup is the gotek green led blinking when trying to read or is always lit ?

Maych
Posts: 8
Joined: Wed Jan 02, 2019 4:04 am

Re: HxC firmware for Gotek drive instructions

Post by Maych » Sat Jan 05, 2019 2:40 pm

The green led on the gotek never comes on at all

Jeff
Site Admin
Posts: 5887
Joined: Fri Oct 20, 2006 12:12 am
Location: Paris
Contact:

Re: HxC firmware for Gotek drive instructions

Post by Jeff » Sat Jan 05, 2019 4:25 pm

Maych wrote:
Sat Jan 05, 2019 2:40 pm
The green led on the gotek never comes on at all
Weird. Which jumper(s) have you set ?

Maych
Posts: 8
Joined: Wed Jan 02, 2019 4:04 am

Re: HxC firmware for Gotek drive instructions

Post by Maych » Sat Jan 05, 2019 5:33 pm

JA and S0 are the two that are on, and was on when I got the drive. I took the S0 off at different times troubleshooting different scenario's.
Right now both are on, and the floppy cable is reversed. I'm using the latest .upd file mentioned earlier, index cfg file and I have 2 HFC files DSKA0000.HFC and DSKA0001.HFC

Post Reply